
Hello, lovely home cooks! Let’s talk about a weeknight dinnertime superhero: perfectly boiled chicken. If you’ve ever found yourself staring into the fridge at 5 PM, wondering how to get a healthy, delicious meal on the table without spending hours you don’t have, you’re in the right place. Knowing how long to boil chicken correctly is a fundamental kitchen skill that unlocks endless possibilities for quick, satisfying meals.

Busy schedules demand simple solutions, and boiling chicken is exactly that especially with this foolproof technique we’re sharing today. It’s straightforward, incredibly versatile, and yields tender, juicy chicken perfect for shredding into salads, tacos, soups, sandwiches, and so much more. Forget complicated recipes or long marinating times; this method is designed for real life, for those evenings when time is tight, but you still want something wholesome and homemade.
We’ll walk through everything step-by-step, removing any guesswork and ensuring you feel confident every single time. Get ready to master the art of boiling chicken and make it a staple in your busy weeknight rotation!

Why Choose Boiled Chicken for Busy Nights?
Before we dive into the how, let’s quickly appreciate the why. Boiling chicken might sound basic, but its simplicity is its strength, especially when life gets hectic:
- Health-Conscious: Boiling is a lean cooking method. You control the ingredients, adding minimal fat while achieving tender results. It’s a fantastic base for healthy meals.
- Incredibly Versatile: This is the star benefit! Once cooked, boiled chicken can be used immediately or stored for later. Think chicken salad sandwiches for dinner, quick taco filling, a protein boost for pasta, or the foundation for a comforting soup. The possibilities are truly endless.
- Simplicity Itself: Minimal prep, minimal active cooking time. Once the chicken is simmering, you can multitask help with homework, set the table, or just catch your breath.
- Meal Prep Champion: Boil a larger batch over the weekend! Having cooked chicken ready to go in the fridge is a game-changer for fast weekday lunches and dinners. It drastically cuts down future prep time.
- Budget-Friendly: Chicken, especially whole chickens or larger packs of bone-in pieces, is often more economical. Boiling is an efficient way to cook these cuts perfectly.
- Flavor Control: While simple, boiling allows you to infuse subtle flavors using aromatics, creating a delicious base adaptable to any cuisine. Plus, you get bonus chicken broth!
Knowing how long to boil chicken efficiently transforms this simple technique into a powerful tool in your kitchen arsenal.
Understanding the Variables: What Affects Boiling Time?
The million-dollar question: exactly how long to boil chicken? While we provide specific timings below, it’s crucial to understand why times can vary. It’s not just about the clock; it’s about reaching a safe internal temperature. Here are the key factors:
- Size and Thickness of Chicken Pieces: This is the biggest factor. A large, thick chicken breast will naturally take longer to cook through than a smaller, thinner one or a chicken tender. Similarly, whole legs or thighs take longer than boneless pieces.
- Bone-In vs. Boneless: Bone-in chicken pieces generally take longer to cook than their boneless counterparts. The bone insulates the meat slightly, requiring more time for the heat to penetrate fully. However, many find bone-in chicken yields more flavorful and moist results.
- Starting Temperature of Chicken: Chicken straight from the refrigerator will take longer to come up to temperature in the pot compared to chicken that has been resting at room temperature for a short while (though for food safety, don’t leave it out too long!). Starting with frozen chicken significantly increases the required boiling time (more on that later!).
- Starting Temperature of Water: Always start chicken in cold water and bring it up to a simmer gently. Dropping cold chicken into already boiling water can cook the outside too quickly, leaving the inside undercooked and potentially making the meat tough.
- Intensity of Simmer: You want a gentle simmer, not a rolling boil. Bubbles should break the surface gently and consistently. Boiling too vigorously can make the chicken tough and rubbery. A gentle simmer allows the heat to penetrate evenly.
- Altitude: If you live at a high altitude, water boils at a lower temperature. This means cooking times will generally be longer. You may need to add roughly 15-25% more cooking time, but always rely on a thermometer for accuracy.
The most reliable way to determine doneness, regardless of these variables, is by using an instant-read meat thermometer. This is the cornerstone of our “foolproof technique.”
Recipe Details: Quick & Easy Boiled Chicken
- Prep Time: 10 minutes
- Cook Time: 20-40 minutes (depending on chicken type/size)
- Total Time: 30-50 minutes
- Servings: Approximately 4 (assuming ~1.5 lbs chicken)
- Difficulty Level: Easy
- Unique Selling Point: Foolproof technique using a thermometer
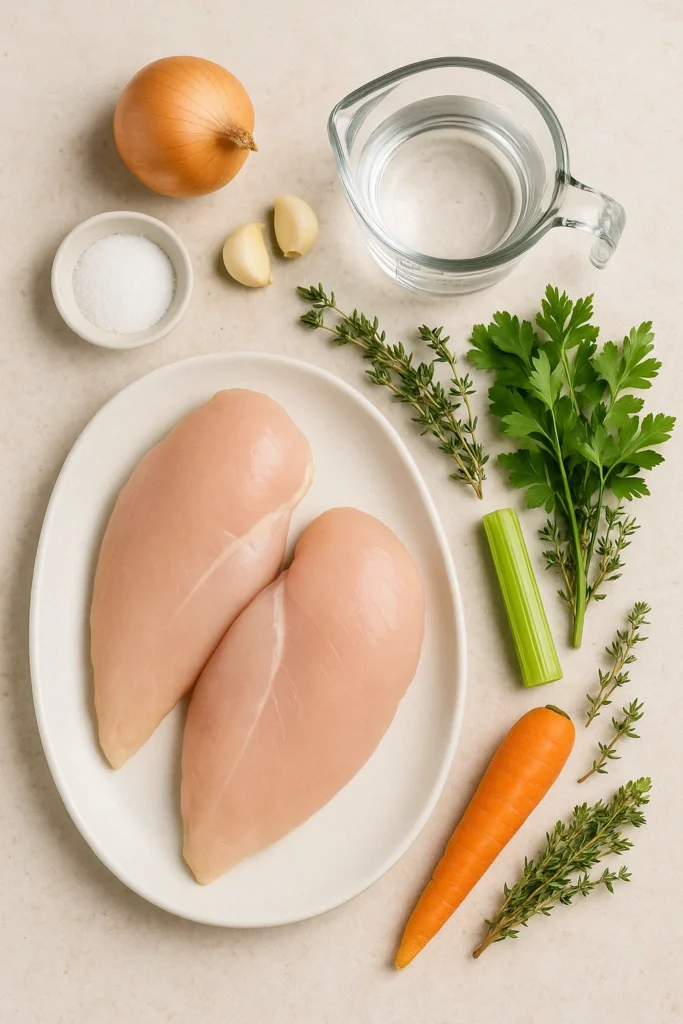
Ingredients You’ll Need
This basic recipe focuses on perfectly cooked chicken. Feel free to add aromatics for extra flavor (see variations section!).
- Chicken: 1.5 – 2 lbs Boneless, Skinless Chicken Breasts or Thighs (Adjust quantity as needed. See notes below for bone-in).
- Water: Enough cold water to cover the chicken by at least 1 inch.
- Salt: 1 teaspoon (optional, but recommended for flavor. Add more to taste if desired).
- Optional Aromatics (Choose a few):
- 1/2 Onion, quartered
- 2 Cloves Garlic, smashed
- 1 Carrot, roughly chopped
- 1 Celery Stalk, roughly chopped
- A few sprigs of Fresh Parsley or Thyme
- 1 Bay Leaf
- 5-10 Black Peppercorns
(Note on Chicken Cuts):
- Boneless, Skinless Breasts: Tend to cook fastest but can dry out if overcooked. Great for shredding. Aim for medium-sized breasts for more even cooking.
- Boneless, Skinless Thighs: More forgiving, stay moist longer due to higher fat content. Excellent flavor. May take slightly longer than breasts of similar thickness.
- Bone-In Pieces (Breasts, Thighs, Drumsticks): Will take longer to cook (add approx. 10-15 minutes to the estimates). The bone adds flavor! Skin can be left on or removed before boiling.
Essential Equipment
- Large Pot or Dutch Oven: Needs to be large enough to hold the chicken comfortably without crowding, with room for water to cover.
- Tongs: For safely adding and removing chicken from the hot water.
- Instant-Read Meat Thermometer: This is non-negotiable for the foolproof method! It’s the only way to guarantee perfectly cooked, safe chicken every time.
- Slotted Spoon or Spider Strainer: Useful for skimming any foam that rises to the surface.
- Cutting Board & Forks/Knife: For shredding or chopping the chicken once cooked.
Step-by-Step Instructions: The Foolproof Way to Boil Chicken
Follow these steps precisely for tender, juicy, perfectly cooked chicken every single time.
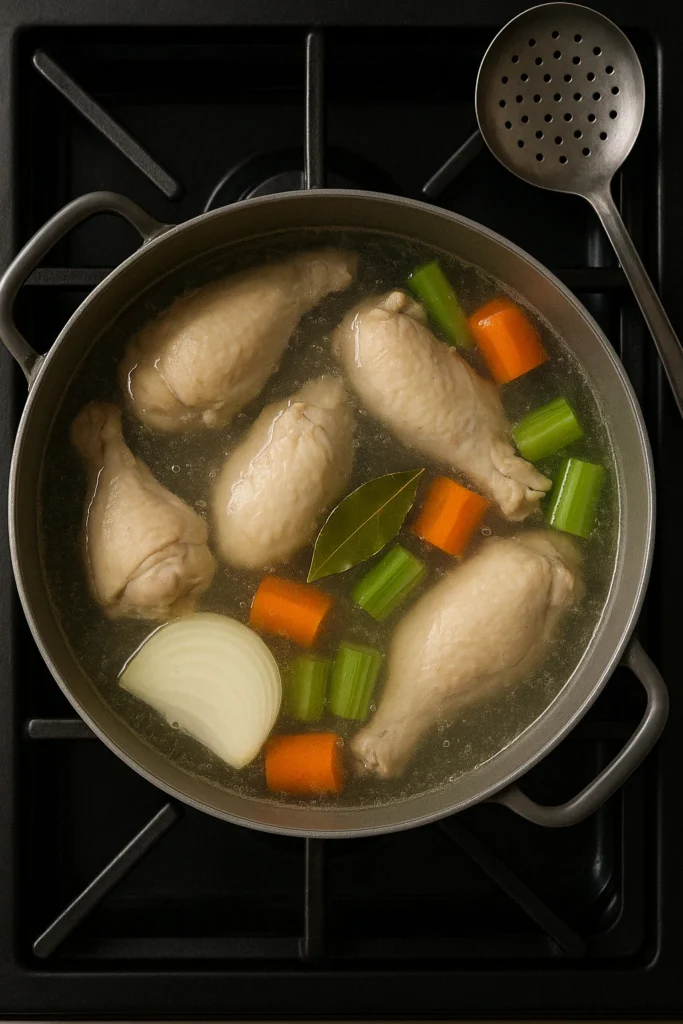
- Prepare the Chicken: Remove chicken from packaging and pat it dry with paper towels. If using very large, thick chicken breasts, you can slice them in half horizontally for faster, more even cooking, reducing the overall how long to boil chicken time. Trim any excess fat if desired.
- Place Chicken in Pot: Arrange the chicken pieces in a single layer at the bottom of your large pot or Dutch oven. Don’t overcrowd the pot; cook in batches if needed. Overcrowding lowers the water temperature too much and can lead to uneven cooking.
- Add Cold Water & Aromatics: Pour cold water over the chicken until it is submerged by at least 1 inch, preferably 1.5-2 inches. Starting with cold water helps the chicken cook more evenly. If using, add your chosen aromatics (onion, garlic, herbs, peppercorns) and salt to the water now.
- Bring to a Simmer: Place the pot over medium-high heat and bring the water just to a gentle simmer. Do NOT bring it to a rapid, rolling boil. As the water heats, some white foam or scum may rise to the surface this is just denatured protein and is harmless, but skimming it off with a slotted spoon will result in a clearer broth if you plan to save it.
- Reduce Heat and Simmer Gently: Once the water reaches a gentle simmer (small bubbles breaking the surface occasionally), immediately reduce the heat to low or medium-low. You want to maintain this gentle simmer throughout the cooking process. Cover the pot loosely, leaving the lid slightly ajar to allow steam to escape.
- Cook Until Done (Check Temperature!): This is the crucial part determining how long to boil chicken. The time will vary based on the factors mentioned earlier (size, bone-in/boneless). Here are estimates:
- Boneless, Skinless Chicken Breasts (medium): 15-20 minutes simmering time.
- Boneless, Skinless Chicken Thighs: 20-25 minutes simmering time.
- Bone-In Chicken Pieces (thighs, drumsticks, breasts): 25-40 minutes simmering time.
- Chicken Tenderloins: 10-12 minutes simmering time.
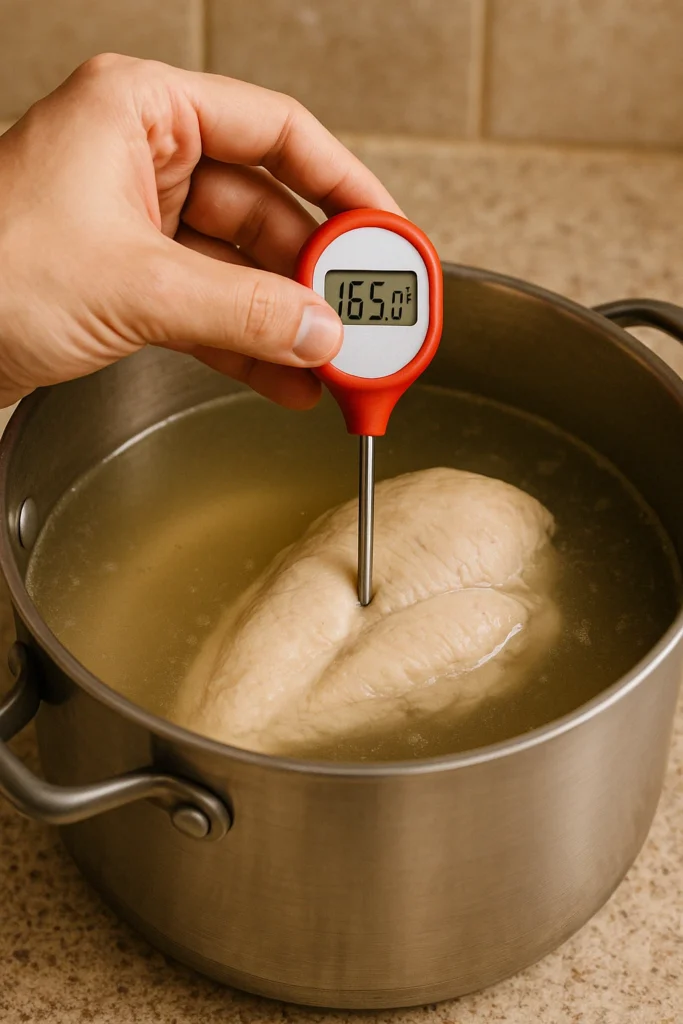
- The Foolproof Check: Start checking the internal temperature about 5-10 minutes before the estimated minimum time. Insert an instant-read thermometer into the thickest part of the largest piece of chicken, avoiding bone if present. The chicken is fully cooked and safe to eat when it reaches an internal temperature of 165°F (74°C).
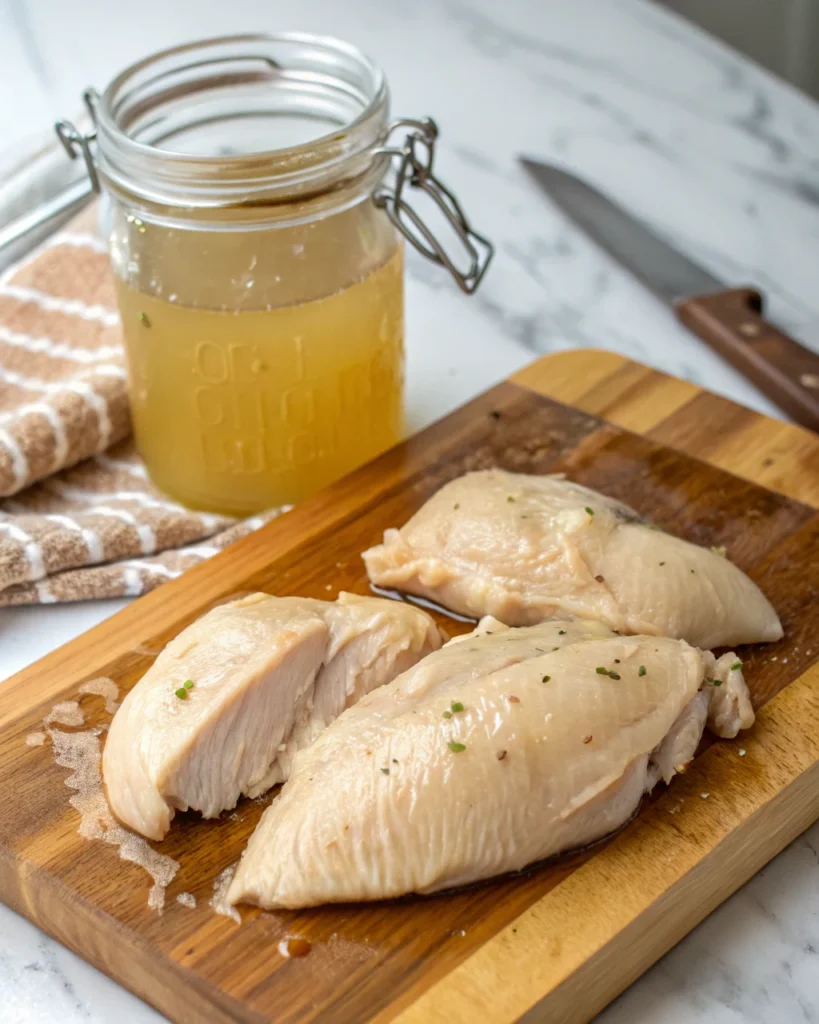
- Remove Chicken Promptly: Once the chicken reaches 165°F (74°C), immediately turn off the heat. Use tongs to carefully remove the chicken pieces from the pot and transfer them to a clean cutting board or plate. Avoid letting the chicken sit in the hot water, as it will keep cooking and may become tough.
- Rest the Chicken: Let the chicken rest for 5-10 minutes before shredding, slicing, or dicing. This helps the juices redistribute throughout the meat, making the chicken more tender and flavorful. Tent loosely with foil if desired.
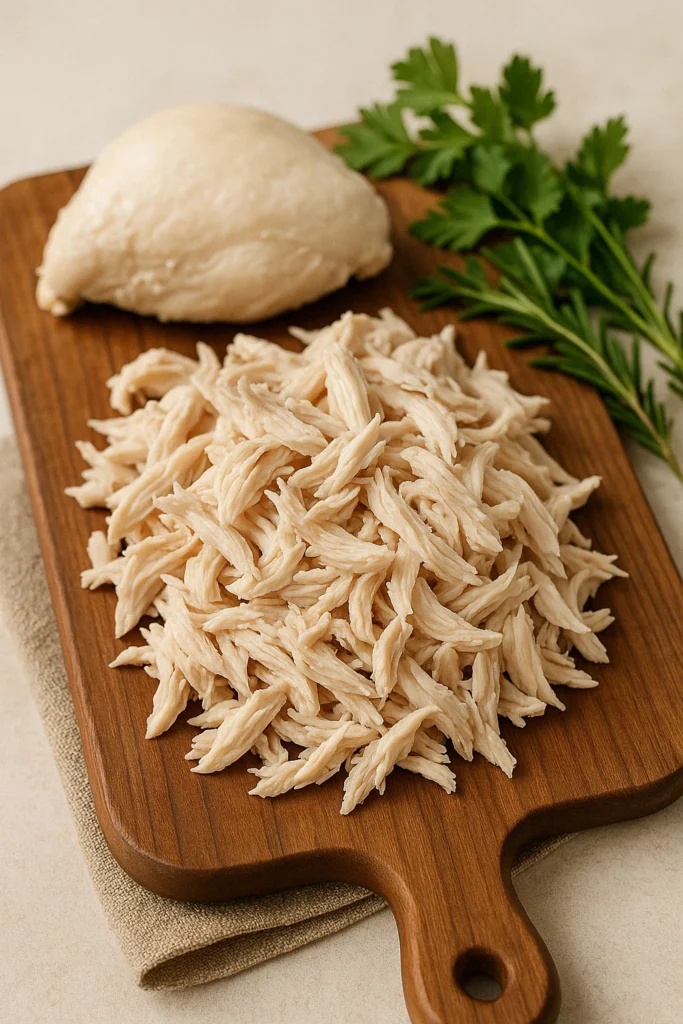
- Shred or Chop: Use two forks to shred the chicken, or use a knife to chop or dice it according to your recipe needs. It should be tender and effortless to shred.
- Save the Broth (Optional but Recommended!): Don’t discard that cooking liquid! Strain the broth through a fine-mesh sieve to remove solids. Let it cool, then store it in airtight containers in the refrigerator (3-4 days) or freezer (up to 3 months) to use as a flavorful base for soups, stews, or cooking grains.
Tips for Success: Nailing Perfectly Boiled Chicken Every Time
These tips elevate basic boiled chicken to a truly reliable kitchen staple.
- Don’t Overcrowd the Pot: Give the chicken pieces space. They should be in a single layer, fully submerged. Cooking in batches is better than cramming them in. This ensures even cooking and helps maintain a consistent simmer.
- Start with Cold Water: We mentioned it before, but it bears repeating. Adding chicken to already hot or boiling water shocks the meat, toughening the outside before the inside cooks. Cold water allows for gentle, even heating.
- Maintain a Gentle Simmer: Avoid a vigorous boil! High heat makes muscle fibers contract tightly, squeezing out moisture and resulting in tough, rubbery chicken. Aim for gentle bubbles breaking the surface. Adjust your stove heat as needed.
- Skim the Scum: While optional, skimming the impurities that rise to the surface during the initial heating phase results in a cleaner-tasting chicken and a clearer, more appealing broth if you plan to save it.
- Season the Water: Don’t underestimate the power of salt! Salting the cooking water seasons the chicken from the inside out. Add aromatics like onion, garlic, celery, carrots, peppercorns, bay leaves, or fresh herbs (parsley, thyme, rosemary) for deeper flavor infusion.
- The Thermometer is Your Best Friend: Seriously, this is the key to knowing exactly how long to boil chicken for your specific pieces. It eliminates guesswork and prevents both undercooking (unsafe) and overcooking (dry/tough). Aim for 165°F (74°C) in the thickest part, avoiding bone. Check multiple pieces if they vary significantly in size.
- Check Temperature Early & Often: Start checking the temperature a bit before the estimated minimum cook time, especially if you’re unsure about the size/thickness. You can always cook it longer, but you can’t undo overcooking!
- Remove Promptly: Once it hits 165°F (74°C), get it out of the hot liquid. Carryover cooking will happen, but letting it sit in the hot broth will almost certainly lead to overcooked chicken.
- Let It Rest: Just like roasting a chicken or grilling a steak, resting boiled chicken for 5-10 minutes before cutting or shredding allows the juices to settle back into the meat fibers. Skipping this step means flavorful juice running out onto your cutting board instead of staying in the chicken.
- Consider the Cut: Boneless, skinless breasts cook fastest but need careful monitoring to avoid drying out. Thighs (boneless or bone-in) are more forgiving and stay moister. Bone-in pieces take longer but add flavor and richness to the broth. Choose based on your preference and final use.
- Save That Broth!: The cooking liquid is now lightly flavored chicken broth. Strain it, cool it, and store it. It’s liquid gold for making soups, cooking rice or quinoa, or adding flavor to sauces.
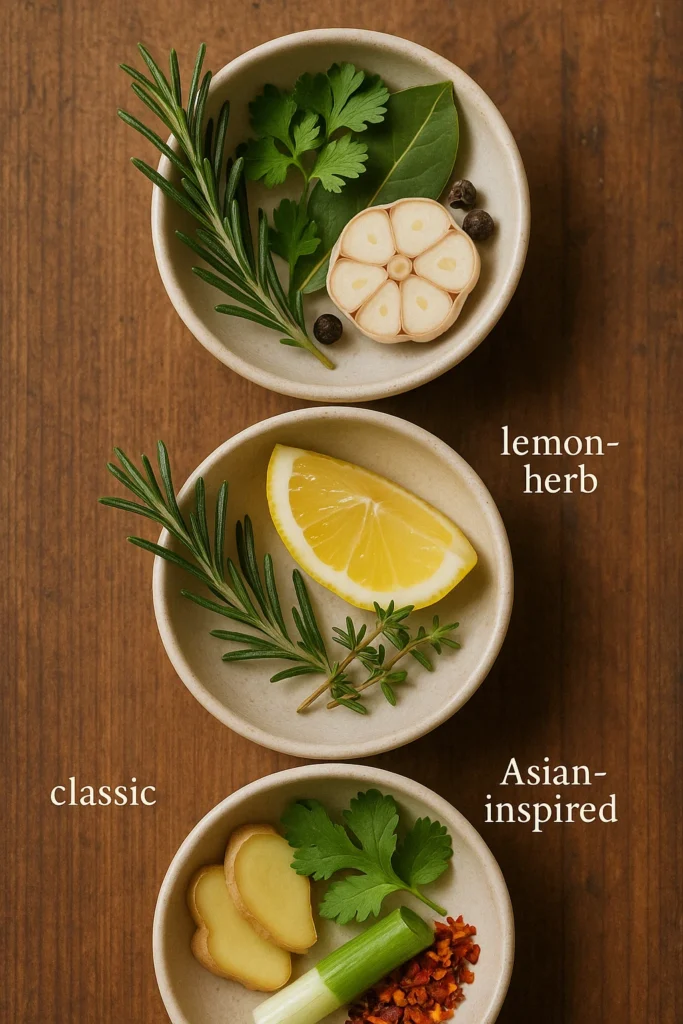
Flavor Variations and Boosters
While the basic method yields perfectly cooked chicken, you can easily customize the flavor profile:
- Classic Aromatics: The onion, carrot, celery, garlic, parsley, thyme, bay leaf, and peppercorn combination is classic for a reason. It provides a balanced, savory background note.
- Lemon Herb: Add lemon halves (squeezed lightly into the water), fresh rosemary sprigs, and extra garlic cloves.
- Asian-Inspired: Include slices of fresh ginger, smashed garlic cloves, scallion whites (save the greens for garnish), and maybe a splash of soy sauce (or tamari for gluten-free) towards the end of cooking (too early and it can make the broth very dark).
- Mexican-Inspired: Add a halved onion, garlic cloves, a dried ancho or guajillo chili (stemmed and seeded), a bay leaf, and a teaspoon of cumin seeds.
- Italian Flair: Use garlic cloves, fresh oregano sprigs, basil stems (save leaves for later), and a strip of lemon peel.
- Use Broth Instead of Water: For an even richer flavor, use low-sodium chicken broth or vegetable broth as your cooking liquid instead of plain water.
Experiment based on how you plan to use the chicken!
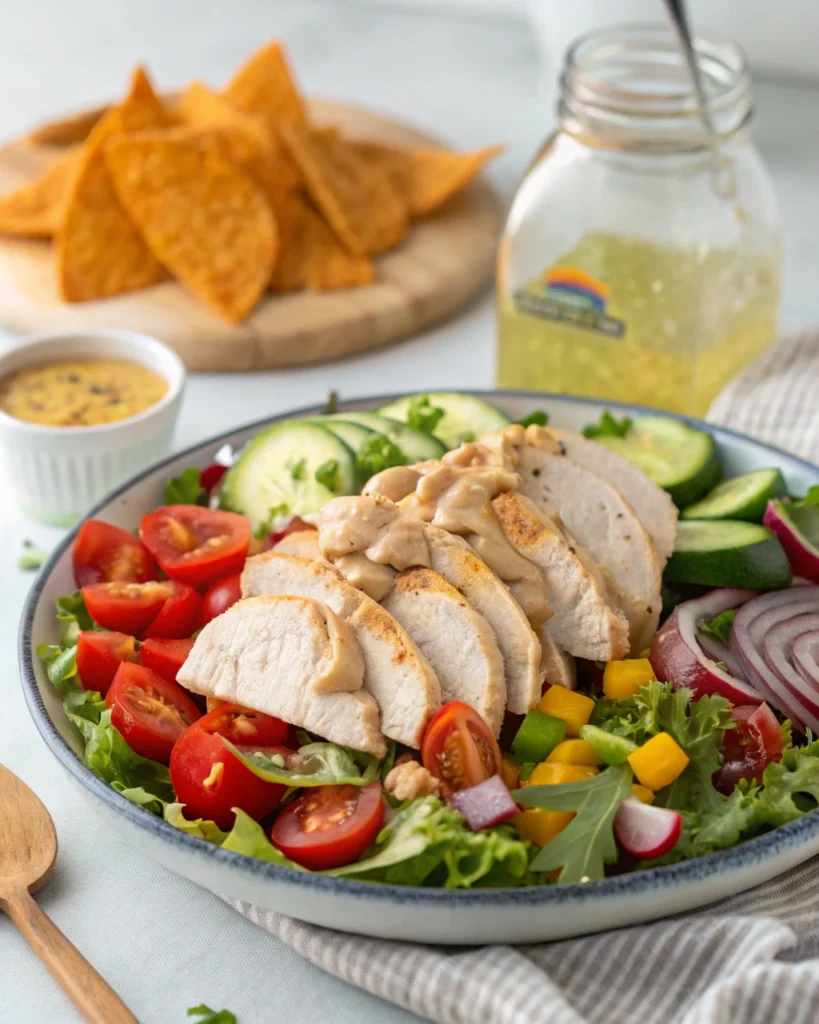
Endless Ways to Use Your Perfectly Boiled Chicken
Okay, you’ve mastered how long to boil chicken, and now you have this beautiful, tender meat. What next? Here are just some ideas for those busy weeknights (and beyond!):
- Classic Chicken Salad: Shred or dice the chicken and mix with mayonnaise or Greek yogurt, celery, onion, salt, and pepper. Serve on bread, croissants, lettuce wraps, or alongside crackers.
- Quick Chicken Tacos/Burrito Bowls: Shred the chicken and toss with taco seasoning. Serve in tortillas or over rice with your favorite toppings (salsa, avocado, lettuce, cheese, beans).
- Speedy Chicken Noodle Soup: Use the reserved broth! Add cooked egg noodles, diced carrots, celery, and your shredded chicken. Season to taste. Instant comfort food!
- Chicken Caesar Salad: Chop the chicken and toss with romaine lettuce, Caesar dressing, croutons, and Parmesan cheese.
- Buffalo Chicken Dip/Sandwiches: Shred the chicken and mix with buffalo sauce, cream cheese, ranch or blue cheese dressing, and shredded cheese. Serve warm with chips/celery or pile onto buns.
- Chicken Pot Pie Filling: Dice the chicken and add it to a creamy sauce with peas, carrots, and potatoes. Top with pastry or biscuit dough.
- Pasta Dishes: Add chopped or shredded chicken to creamy Alfredo sauce, pesto pasta, or a simple marinara.
- Chicken Quesadillas: Layer shredded chicken and cheese between tortillas and cook until golden and melty. Serve with sour cream and salsa.
- Healthy Grain Bowls: Top cooked quinoa, farro, or brown rice with shredded chicken, roasted vegetables, and a light vinaigrette.
- Simple Protein Addition: Simply slice or shred the chicken and add it alongside steamed vegetables and a sweet potato for a straightforward, healthy meal.
- Chicken Fried Rice: Dice the chicken and add it to your favorite fried rice recipe.
- Creamy Chicken Casseroles: Use shredded chicken as the base for comforting casseroles with rice or pasta, veggies, and a creamy sauce.
Having this pre-cooked chicken ready makes assembling these meals incredibly fast.
Storing and Reheating Boiled Chicken Safely
Proper storage is key to enjoying your boiled chicken later:
- Refrigeration:
- Let the chicken cool slightly (but don’t leave it at room temperature for more than 2 hours, or 1 hour if the ambient temperature is high).
- Store the cooked chicken in airtight containers or resealable plastic bags.
- Refrigerate promptly. Properly stored, boiled chicken will last for 3-4 days in the refrigerator.
- Store the strained, cooled broth separately in airtight containers in the fridge for 3-4 days.
- Freezing:
- Ensure the chicken is completely cool.
- Portion the chicken (shredded, diced, or whole pieces) into freezer-safe bags or containers. Squeeze out as much air as possible from bags to prevent freezer burn.
- Label clearly with the date.
- Frozen boiled chicken is best used within 2-4 months for optimal quality, though it remains safe longer.
- Freeze the cooled broth in freezer-safe containers, ice cube trays (for small portions), or freezer bags. Leave some headspace for expansion. The broth can be stored for up to 3 months.
- Thawing:
- Thaw frozen chicken overnight in the refrigerator for the safest method.
- For faster thawing, you can use the defrost setting on your microwave or place the sealed bag of chicken in a bowl of cold water, changing the water every 30 minutes. Avoid thawing at room temperature.
- Reheating:
- Reheat chicken gently to avoid drying it out.
- Microwave: Place chicken in a microwave-safe dish, perhaps with a splash of broth or water, cover loosely, and heat until warmed through (internal temperature should reach 165°F/74°C if reheating from chilled).
- Stovetop: Add chicken to soups, stews, or sauces and heat gently within the dish. You can also gently sauté shredded or chopped chicken in a pan with a little oil or broth until warm.
- Oven: Place chicken in an oven-safe dish with a little broth, cover with foil, and heat in a moderate oven (around 325°F/160°C) until warmed through.
Always ensure reheated chicken reaches a safe internal temperature.
Troubleshooting Common Issues
Even simple techniques can have hiccups. Here’s how to troubleshoot:
- Problem: My chicken is tough/rubbery.
- Cause: Most likely overcooking or boiling too vigorously.
- Solution: Pay close attention to the internal temperature using a thermometer and remove the chicken promptly at 165°F (74°C). Ensure you are using a gentle simmer, not a rolling boil. Let the chicken rest before cutting.
- Problem: My chicken is dry (especially breasts).
- Cause: Overcooking is the main culprit. Boneless, skinless breasts are low in fat and cook fast.
- Solution: Use that thermometer diligently! Check the temperature early. Consider using bone-in breasts or thighs if you often find breasts dry. Resting the chicken also helps retain moisture.
- Problem: The chicken seems bland.
- Cause: Under-seasoning the cooking liquid.
- Solution: Be sure to add salt to the water. Don’t be shy with aromatics onion, garlic, herbs, and peppercorns make a big difference. Boiling in broth instead of water also boosts flavor significantly.
- Problem: My broth is cloudy or murky.
- Cause: Boiling too rapidly, or not skimming the initial scum.
- Solution: Maintain a gentle simmer. Skim off any foam that accumulates during the first 10-15 minutes of cooking. Straining the finished broth through a fine-mesh sieve (lined with cheesecloth for extra clarity if desired) also helps.
FAQs: Your Questions Answered About Boiling Chicken
Here are answers to some common questions regarding how long to boil chicken and the process:
- How do I really know when my boiled chicken is cooked safely? The absolute best and safest way is to use an instant-read meat thermometer. Insert it into the thickest part of the chicken, steering clear of the bone. It must read 165°F (74°C). Visual cues can be helpful secondary checks: the juices should run clear when pierced (not pink), and the meat should be opaque and white (or typically colored for thigh meat) all the way through with no pinkness remaining. However, visual cues alone are not foolproof, especially with larger pieces or bone-in cuts. The thermometer is the gold standard for safety and perfect results.
- Can I boil chicken directly from frozen? How does it affect how long to boil chicken? Yes, you can boil chicken from frozen, but it requires important adjustments. It will take significantly longer approximately 50% longer than the time required for thawed chicken. Ensure the water remains at a gentle simmer once it returns to temperature after adding the frozen chicken. Most importantly, use a meat thermometer to confirm the internal temperature reaches 165°F (74°C) in the thickest part. Be extra vigilant checking the temperature, as the outside may appear cooked while the center lags behind. Never partially cook chicken and finish later, as this allows bacteria to grow. Cook it fully in one go.
- What’s the best cut of chicken for boiling? It all depends on your preference and how you plan to use it!
- Boneless, Skinless Breasts: Cook relatively quickly, easy to shred/dice, very lean. Best for salads, sandwiches, quick additions where lean meat is preferred. Need careful monitoring to avoid drying out.
- Boneless, Skinless Thighs: More flavorful and moist due to higher fat content, more forgiving if slightly overcooked. Excellent for tacos, bowls, and dishes where richer flavor is desired.
- Bone-In Pieces (Breasts, Thighs, Legs): Take longer to cook but the bone adds significant flavor to both the meat and the resulting broth. The meat tends to stay very moist. Great for soups or when flavor is paramount.
- Whole Chicken (cut into pieces): Economical and yields a variety of cuts plus fantastic broth. Requires longer cooking time and checking different pieces for doneness.
- How much water do I actually need? The general rule is to add enough cold water to cover the chicken pieces completely by at least 1 inch, and ideally 1.5 to 2 inches. This ensures the chicken stays submerged and cooks evenly in the simmering water. Too little water might expose parts of the chicken as it cooks, leading to uneven results.
- Is the boiling water (broth) reusable? How? Absolutely! That liquid is now lightly flavored chicken broth and is wonderful for adding flavor to other dishes. Let it cool, then strain it well through a fine-mesh sieve to remove the aromatics and any scum. Keep it in an airtight container in the refrigerator for 3-4 days or freeze it for up to 3 months. Use it as a base for soups, stews, sauces, or for cooking grains like rice, quinoa, or risotto. It’s a delicious bonus!
Estimated Nutritional Information
Please note that this is an estimate per serving (assuming approx. 4 oz cooked chicken breast per serving, boiled in lightly salted water) and can vary based on the specific cut of chicken used (breast vs. thigh, skin on/off), portion size, and any added ingredients.
- Serving Size: ~4 oz (113g) cooked boneless, skinless chicken breast
- Calories: ~150-180 kcal
- Protein: ~30-35 g
- Fat: ~3-5 g (mostly unsaturated if skinless)
- Saturated Fat: ~1 g
- Cholesterol: ~80-95 mg
- Sodium: ~70-80 mg (will be higher if more salt is added to water)
- Carbohydrates: 0 g
- Sugar: 0 g
Boiled chicken is naturally low in carbohydrates and fat (especially skinless breast) and very high in lean protein. Using thighs or skin-on chicken will increase the fat and calorie content. The broth itself will contain trace amounts of nutrients and sodium.
Your Go-To Method for Easy, Delicious Chicken!
Mastering how long to boil chicken using this simple, foolproof technique opens up a world of quick and healthy meal possibilities, perfectly suited for busy weeknights. Remember, the key is gentle simmering and using that trusty meat thermometer to guarantee perfectly cooked, juicy results every single time. No more dry, rubbery chicken just tender, versatile protein ready for your favorite recipes.
From salads and sandwiches to tacos and soups, this easily adaptable boiled chicken will become a staple in your kitchen. Embrace the simplicity, enjoy the delicious results, and reclaim some precious time during your busy week!
Conclusion
Mastering how long to boil chicken using this simple, foolproof technique opens up a world of quick and healthy meal possibilities, perfectly suited for busy weeknights. Remember, the key is gentle simmering and using that trusty meat thermometer to guarantee perfectly cooked, juicy results every single time. No more dry, rubbery chicken just tender, versatile protein ready for your favorite recipes.
From salads and sandwiches to tacos and soups, this easily adaptable boiled chicken will become a staple in your kitchen. Embrace the simplicity, enjoy the delicious results, and reclaim some precious time during your busy week!
We’d love to hear from you!
Did you try this method? Do you have any favorite ways to use boiled chicken? Leave a comment below and share your experience or ask any questions you might have!
Found this guide helpful? Share it with your friends and family on Pinterest or Facebook! Help others conquer the weeknight dinner rush too.
Want more simple, delicious recipes and helpful kitchen tips delivered straight to your inbox? Sign up for our newsletter! You’ll get exclusive content and be the first to know about new posts.
Happy Cooking!